 Yorimichi Games
How to play Balance Stack
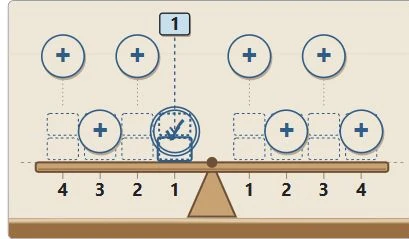
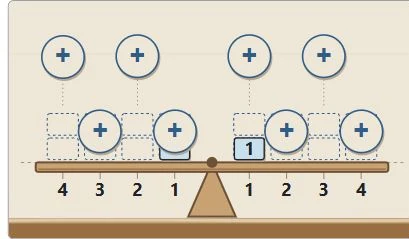
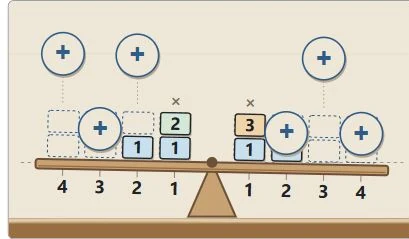
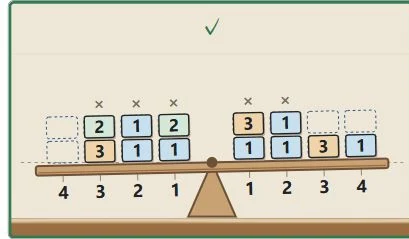
Balance Stack is a quiet placement puzzle about a beam supported at its centre. Place numbered weights on either side without letting the beam tilt beyond its limit. The aim is to keep a useful balance while fitting the required number of blocks, rather than to build the tallest tower. Each block has a weight of one, two or three. Each side of the beam has four positions, marked by their distance from the pivot. You can put two blocks at each position. There is no time limit and no need to tilt your device.
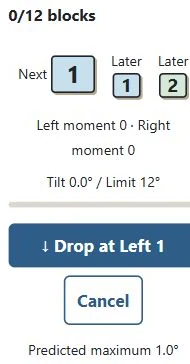
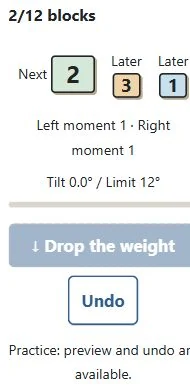
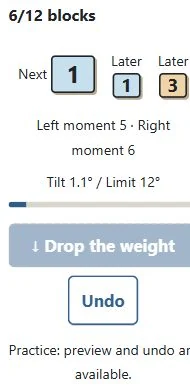
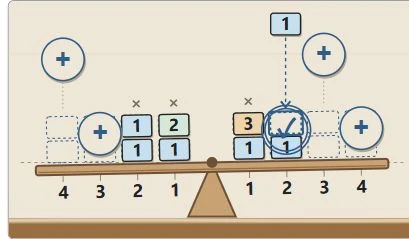
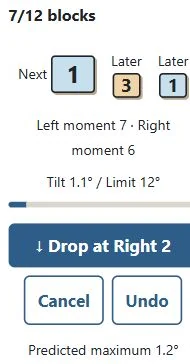
Choose a difficulty and either Standard or Practice, then press Start. Read the next weight and the two weights following it. Tap a plus or a dotted space on the beam. The next weight appears above your chosen position with a dotted drop line. Press Drop to confirm. Tap the same plus, a blank area, Cancel or Escape to cancel the selection. Selecting a position alone does not put a block down, so you can compare alternatives before committing. After placement, wait for the beam to finish moving before making your next choice.
Weight times distance: the balance rule
On a level beam, the turning effect of a weight depends on both its size and its distance from the centre. A weight of three at distance one has the same turning effect as a weight of one at distance three. This is why equal numbers of blocks are not necessarily balanced, and why unequal total weights can still balance. You do not need to memorise a physics formula to play: multiply the number on each block by the distance shown under its position.
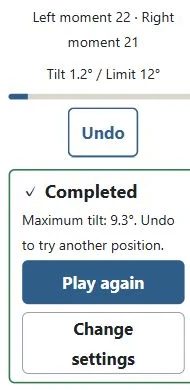
The Left moment and Right moment displays add these products for all blocks on each side. These numbers give you a useful first comparison. If the right moment exceeds the left by four and the next block weighs two, a left position at distance two would cancel that difference. However, you should also check whether that position still has room and whether using it now leaves useful choices later. The displayed moments describe the weights; the central support also contributes to the beam’s balance.
Tilt limits, success and failure
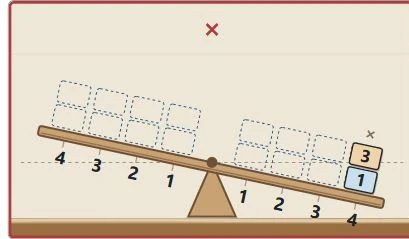
The support gently resists a tilt, so the two moments do not have to match exactly after every placement. A small imbalance can leave the beam resting at a small angle. The horizontal dotted line helps you judge the direction, while the tilt readout shows the size of the angle. A right end pointing down means a rightward tilt. A left end pointing down means a leftward tilt. The sign is shown by the beam itself rather than by a minus sign in the readout.
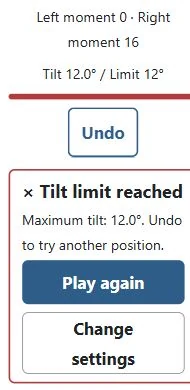
A round ends when the beam reaches or exceeds the limit for your difficulty during a placement. The final block remains visible, but it is not counted as safely placed. You complete the round by placing the target number without reaching the limit. The last required block must survive the same check as every earlier block. Repeated taps while the beam is moving do not add extra weights. There is no last-second rescue action: choose carefully before pressing Drop.
Two layers and planning ahead
Every position can hold two blocks. If a weight of one and a weight of three share a position at distance two, together they contribute a moment of eight. The block labels stay visible so you can work this out yourself. Once a position has two layers, it shows a cross and cannot be selected. You cannot move a block already placed in Standard mode, and you cannot exchange the next weight for a later one. The queue must be used in order.
A second layer also puts some weight higher above the beam. When the beam is already tilted, this makes the loaded beam less forgiving. A difference between the two moments that was manageable early in a round may leave less room later. It is often helpful to save a nearby position for a heavy block and use a more distant position for a light one. Do not spend every nearby space simply because it produces the smallest angle now. The next three weights help you make a short plan.
Difficulty levels and Practice mode
Easy has the strongest restoring support, a tilt limit of twelve degrees and a target of twelve blocks. Normal uses a limit of twelve degrees and asks for fourteen blocks. Hard has the weakest support, a limit of twelve degrees and a target of sixteen blocks. All three levels use weights from one to three, four positions on each side and a maximum of two layers per position. Hard therefore fills every available space and leaves less freedom to correct a poor early decision.
Practice follows the same physical rules but adds a predicted maximum angle for your selected placement and an Undo button. The prediction applies to the current beam and the next single block. It does not promise that all later placements will be safe. Undo is also available after a failed placement, allowing you to try another position. Practice rounds are kept separate from Standard records. Use them to compare two choices from the same situation, then try a Standard round without the preview.
Touch controls, keyboard and saved progress
On a phone or tablet, tap a plus or a dotted space on the beam and then tap Drop. Dragging is unnecessary, and pressing harder does not improve the balance. On a computer you can use the same positions with a mouse. The left and right arrow keys cycle through positions. Space drops the next weight when the page or a position handle has focus. In Practice, Z undoes the previous placement. When a button has focus, its normal keyboard behaviour takes priority. You can also use Tab to reach each available control.
Progress is stored in the browser on your device. Open Settings to pause and use Resume to return to the same beam. Switching between the Japanese and English pages uses the same saved round. Moving to another tab pauses play. If you close the page while the beam is moving, the confirmed block has already been placed and you return to the resulting position. Clearing browser storage removes that progress. A browser that prevents local storage may let you play without keeping a saved round.
Balance puzzle tips
First, compare the two moment totals instead of counting blocks. Two light blocks far from the centre can have more effect than one heavy block nearby. Second, try to place a heavy weight close to the pivot. This reduces the size of the change you are committing to. Third, avoid overcorrecting: adding a large moment to the lighter side can turn a small imbalance into a large imbalance in the opposite direction. A little remaining tilt may be safer than an aggressive attempt to make the beam level.
Fourth, preserve useful spaces. If you have a light block now and a heavy one next, consider whether the light block can go farther out while the heavy one uses a nearby space. Fifth, check the second layer. It adds another weight at the same distance and uses the last space in that column. Finally, compare alternatives in Practice. Watch the predicted angle and then the beam itself. Undo and try a different distance. This gives you a clear example of how position changes the outcome without requiring quick reactions.
Frequently asked questions
Why does the beam tilt when both sides have the same total weight? The weights may be at different distances from the centre. Distance matters as well as weight. Do I need to make the beam perfectly level? No. The central support can hold a small imbalance, provided the tilt stays below the limit. Why can an empty position still be dangerous? Space and stability are different things. A heavy block at an outer position can create too much turning effect even when that position is completely empty.
Can I change the order of the blocks? No. You must use the next weight shown in the queue. Can I take back a move? Only in Practice. Is there a timer? No: take as long as you need before placing a block. What does Play again do? It starts a new sequence at the current difficulty and mode. If you want to compare positions on exactly the same sequence, use Practice and Undo instead. Does a failed final block count towards the target? No. Only weights that remain below the tilt limit count as safely placed.
The beam model and real-world balance
The puzzle is inspired by turning effects around a pivot and by a support that resists displacement. It uses a simplified beam whose numbered weights stay attached to their chosen positions. The support brings the beam towards a resting angle, while resistance reduces its movement. This lets you focus on weight, distance, available space and the order of your choices. The degree readout describes this game’s beam, not a measurement of a toy on your desk.
The blocks do not slide, collide or fall separately. You cannot catch the beam with a finger or influence it by moving the phone. The numerical weights and distances are relative units rather than kilograms or metres. The target counts, tilt limits and Practice tools are rules of this particular game, not a universal set of rules for balancing toys. If you experiment with an actual ruler or balance at home, its support, friction and moving weights may behave differently. Treat the puzzle as a way to explore a balance idea, not as a prediction of every physical object.